How to photograph lightning

Photos of lightning rank among the most spectacular of any type of photo. This is the result of two factors working together in a photograph that are specific to the medium of photography:
  • The ability to arrest time (here still photos have the advantage over movies),

  • The ability to condense time onto a single image (so that multiple lightning strikes become overlayed into a single megaburst in the print)

Here's an example that I shot from our of my window a couple of years ago. Feel free to click through to my flickr page to see it large (it looks way better that size anyway.)

Bearing this in mind, lets have a quick look at how to set up and shoot lightning without becoming a statistic. Just remember that lightning is VERY dangerous, and the rain that usually accompanies lightning does no good to you camera. For this reason I tend to do my lightning shoots indoors, usually from my apartment window. I don't like to go wandering round hillsides and fields, just asking for a quick zap as I hold onto the steel of my tripod and put it into puddles of water.


In terms of camera settings, you need to use manual settings on you camera for this, and you definitely need to use a long exposure. It's hard to guess the exact moment when lightning will strike, so what I usually do is set my camera on bulb or between 20 and 30 second exposure times (tripod essential), and shoot while hoping that the strike will hit during that time. This can be frustrating, and requires patience, but here again the advantage of being safely indoors makes itself clear. Rather than freezing in the rain on some blasted heath, I prefer to be warm, dry and having a coffee or a whiskey. You will find that lightning tends to strike between frames, no matter how short you keep your time between button presses.


For the F-stops, the key is to maximize your depth of field: it sucks to get a perfectly exposed, perfectly timed shot of lightning that has a great foreground and blurry lightning. So, minimize the bokeh, and shoot between f16 and whatever the minimum on your lens is.


I also usually shoot my lightning at night: I'm at home more (the day job does tend to get in the way of these kinds of experiments) and I can also be more sure that a long exposure won't overexpose my shot. I still go for quite a low ISO rating, especially on my older Nikon D50, which tends to be very noisy.

Compositionally, I try to put some other things in the frame. A photo of black sky and a streak of lightning doesn't look great, but a shot of a hillside or a house or some other feature gives balance, interest and scale to the shot.

And that's how I shoot lightning. Feel free to check out the incredible lightning shots in the Flickr Top Twenty Lighning Shots pool, or look at National Geographic for more great photos. And you can always read the National Geographic Field guide to Landscape Photography for more on how to shoot this incredible natural phenomenon.

Cantonese Opera Again!

After running all my Cantonese opera shots through Lightroom ( which is a total Godsend, I can't believe it's taken me this long to get involved in it) I've found that I have quite a few that I really like. Stage lighting helps, but I think the thing that contributed most to the final look of the day was my new Nikon D300.

This camera rocks, seriously. Much better in low light than my old Nikon D50, which couldn't go above ISO 800 in most situations, and which didn't have the megapixel depth for much cropping and post-processing.

You can clearly see a differnence between these two cameras, if they are used side by side under the same conditions.

Here are more of the shots, and I have to point out that these were taken during a performance of a very famous opera company, with no flash allowed and very tight angles (I had to duck down at the fornt of the stage and not bother anyone who was trying to appreciate the show).

Enjoy!

Cantonese Opera at Lam Tsuen  (59 of 21)

Cantonese Opera at Lam Tsuen  (57 of 21)

Cantonese Opera at Lam Tsuen  (56 of 21)

Cantonese Opera at Lam Tsuen  (52 of 21)

Cantonese Opera at Lam Tsuen  (51 of 21)


Cantonese Opera at Tai Ping Festival in Hong Kong

I went up to Lam Tsuen in Tai Po (Hong Kong) over the weekend, to a once-in-ten-year festival that they were having up there. Crowded as all hell, but that's part of deal here in Hong Kong. It's even part of the criteria for judging whether an event is enjoyable: it needs to be "hot" and "noisy" to be good, or in Cantonese " Yi-Lau". It was both of those, and very good spirited and relaxed as well. I wish I could find more events like that here.

It was really my first time to see a full Cantonese Opera show live, and it was a spectacle. I was lucky enough to be able to go backstage to see the preparations, and to do this with a very famous opera company: Ming Chee Sing Chinese Opera.

Here are some of the shots that I got from Sunday, and there are a lot more on my Flickr stream:

Cantonese Opera at Lam Tsuen  (3 of 95)

Cantonese Opera at Lam Tsuen  (5 of 95)

Cantonese Opera at Lam Tsuen  (11 of 95)

Cantonese Opera at Lam Tsuen  (17 of 95)

Cantonese Opera at Lam Tsuen  (25 of 95)

Cantonese Opera at Lam Tsuen  (41 of 95)

Cantonese Opera at Lam Tsuen  (42 of 95)

Cantonese Opera at Lam Tsuen  (43 of 95)

Clear Skies and Stressbusting Shots

Yesterday was the first really good day we've had for while here in Hong Kong: it's been raining harder than I can remember it doing through the other spring and early summer stretches I've experienced here. So, in honour of this and to relax after a horrific week at work (and with the prospect of a week designed by Heironymous Bosch coming next week) I headed off to two of my best shooting spots: the marina over the road from us, and the beach next to it.

After shooting about 120 frames, I came home and hooked in about four or five shots that I'm happy with.

Gold Coast Marina

Just good to be outside shooting again. This one was done with a polarizing filter, a -2 grad and a yellow filter to warm up the overall light.

Gold Coast Marina

Another one of the stressbusting, clear-sky-celebrating set of shots I made yesterday. Again, Polarizer, -2 grad ND, yellow filter.

The beach at Gold Coast, Tuen Mun

This is another shot while I was out enjoying the clear skies and lack of rain. I made this one without any filters, but with me running down the beach to the lifeguard watchtower shooting my flash across the sand to pull details in the foreground.

I think I needed to change the batteries, looking at how the flash power faded through the run.

But hey, I can always go back an try again. The beach is just over the road from me.

Weighing in on HDR


This is the first HDR image I ever saw, and I was blown away by it. I sat staring at my computer screen and thought “Wow. How did they even do that?”

Then, I saw the flickr tag [HDR] attached to the image, clicked it, and the door to a whole new world of image possibilities was opened. I’ve tried a few of my own HDR images, which don’t compare to the masters of the art but which are fun to shoot and intriguing to play with. The problem is, ever since I’ve started seeing these images, I’ve seen comments underneath them which decry them as being fake, or not really photographs. This is a position that I don’t accept at all, and I always feel that people have a weird, narrow and close-minded idea of what a photograph is.

Photography is an Art, not a Competitive Sport.

Sport needs rules. FIFA, IOC, NBA, ICC and a whole host of international and local acronyms exist to evaluate performances, equipment and rules of every game invented, to make sure that what happens on the pitch, court or field is cricket, football, golf or basketball or whatever, and that each event is fair and the playing fields are level. Photography is not like this. There is no International Photographic Committee, which regulates which cameras, lenses and tripods are acceptable, and which technique is allowed to you on game day. There are no performance-enhancing techniques that are banned, and there is no way of making an image that is outlawed due to an unfair advantage.

Photography is a communicative art form, and that means that anything goes when it comes to making an image: if you can communicate the picture of the world that you had in your imagination to someone else through an image, you’ve succeeded. End of story.

All media are less than perfect at representing the world due to technical limitations which arise from the physical characteristics of that media, and it would be a dumb to try and limit development of a medium because it will be better than it was before. The essence of development is extension and improvement, and this has been happening to photographic media ever since the first silver nitrate image was made. HDR techniques are the latest imaging trend in a long line of developments which can be traced back to at least 1280 AD, and the development of silver nitrate by Abertus Magnus. Yes, people. 1280 AD.

It always gets me when people say “Nice work, but it’s not really photography – more like cheating” when talking about an imaging technique. I guess Man Ray may have had some of these comments while showing his solarized images – but it seems that in the digital imaging age, more techniques are being developed, and more people are taking photography seriously. Many of these people seem to have forgotten that “image” and “imagine” come from the same root, and that Latin root “imago” refers to “an idealized mental image” of another person or of the self.

It’s that definition of image that we should remember with photography. There really is no such thing as photographic realism – even for journalism. In the old days of “pure” analogue photography the photographer could select image elements and manipulate them with camera settings and darkroom techniques. Photography could only approximate reality, but never truly represent it. A photographer should realize that their craft occupies a nexus between their experiential world and their inner world, and that any method of realizing either of these worlds in a two-dimensional format is fair game.


Hello HDR

Enter the High Dynamic Range image. And it’s kind of disappointing to see that even in this small and contested niche of imaging, there are 2 separate debates as to HDR’s authenticity as an imaging method. The first is whether HDRs are photographs, and the second is which method of creating an HDR is the “true” method. So I’m going to talk first about what an HDR image is, and then we’ll see that there really is no such thing as a “true” or a “false” HDR image.

An HDR image is a single image which has used more than one exposure value to create a dynamic range which extends beyond what is possible to capture with a single exposure. There is more detail, from shadows to highlights, than would be possible in an image using other techniques.

To create an HDR image, you generally need a digital camera that shoots at above 8-bit resolution and software that can overlay your images to create that heightened dynamic range in a single image. Of course you can use a scanner to scan your negs or prints, and people have developed techniques for brute-forcing JPEGs into HDRs, but to keep it simple I’ll just describe the RAW version.
Photomatix is both easy and free to use, but leaves a light watermark until you pay for it.

"Pure" HDR images:

The easiest way to create your HDR is to find a non-moving scene with a lot of contrast from dark to light, and set up your camera on a tripod. First, set your light balance to manual, and adjust it according to your scene. Then, find the master exposure by shooting the scene at your camera’s recommended exposure. From this, you will adjust your shutter speed to shoot 3 images at lower exposure levels (by stopping down in 3 successive steps) and then you’ll return to the master exposure level and then shoot three images at higher exposure levels by stopping up in 3 successive steps).

You do this so that the camera has captured a range of images which will show detail from the vary dark areas of your scene into the very light areas.

Then, when you get home, open each image in camera raw, make sure that they are all the same white balance, and open them in your HDR generating software. The software will overlay the images, and then you will begin to have creative control over what the final scene will look like – from realistic but detailed to very saturated and akin to an oil painting done by an old master or renaissance era painting.


The other kind of HDR


That's great, if you can find a scene that doesn't move. But what happens when you have things in the frame that won't godammed settle down. Trees blowing in the wind. People. Animals. Cars. Even clouds or waves, if you are using longer exposures. Well, then you use your single raw file, adjust the exposure level using camera raw in the manner described above (Master, 3 incremenal stops down and 3 incremental stops up) and save the files as copies. Then, open in your HDR software, blend, rinse and repeat.

Making it look right (or wrong, depending on what you're trying to do)

I can’t do better than this blog at describing what that creative control of an HDR image entails, so I’ll send you on over for further reading. It's a great read, and it's got some stunning HDR images to keep you turning the digital pages, so have a look - it didn't start a wave of interest that redefined blog reader statistics for nothing!

So, there we have it. HDR. Hardly a tool of the devil, now is it? Certainly not going to bring civilization as we know it to its knees. Just a very nice tool for you to render your mental image of a scene in a two-dimensional way. And if you want to see why you may want to do this, have a look at these phenomenal HDR images, and keep going back to the
HDR group on flickr.


Cloud Gate, originally uploaded by iceman9294.
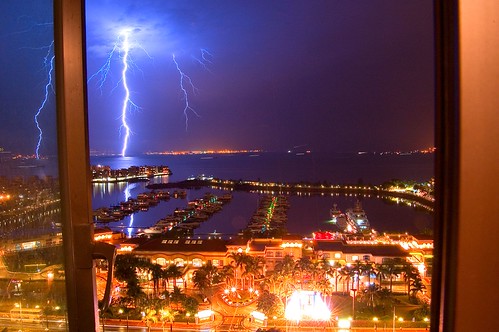
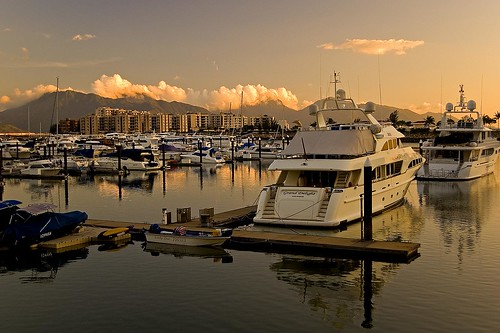
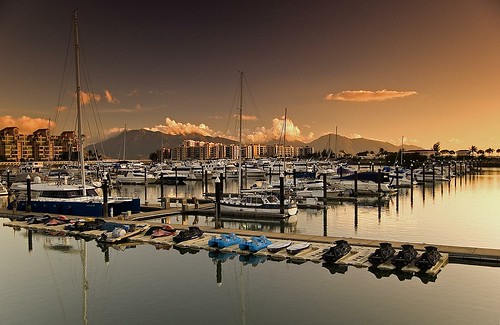
A perfect example of a little HDR processing going a long way. The photo doesn't look blown out into the realm of painting, but there is a range of detail across the light spectrum which adds to the "interestingness" of the image.


One Night in Bangkok, originally uploaded by Stuck in Customs.
I love this one, not just because of the techinical skill (although Stuck in Customs does have a lot, and many other photos display it to greater advantage) but because I used to live justg behind this temple in Bangkok, and I would see it every day on my morning and evening ferry trips to work.


Sun and Signs, originally uploaded by .: sandman.
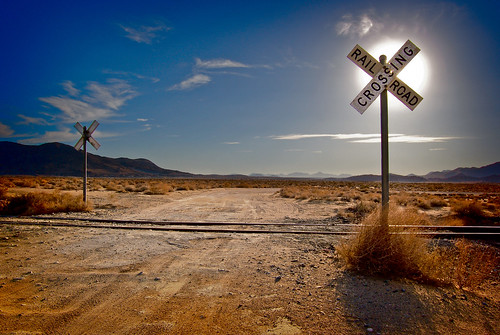
Another great photorealistic HDR, although the shooter argues that at the time he took this photo the sky didn't look anything like it does in the picture. This image is a poster child for HDR processing: I've tried very similar shots to this one at a turnoff to Nieu Bethesda in South Africa, and been very disappointed with the results: traditional camera techniques are inadequate for this kind of image. You could never get detail in the sign and have the sun behind it.
A great shot, and deceptively simple.
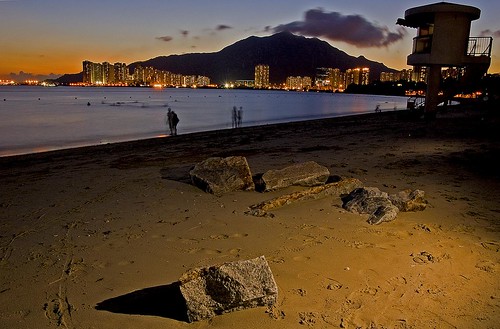
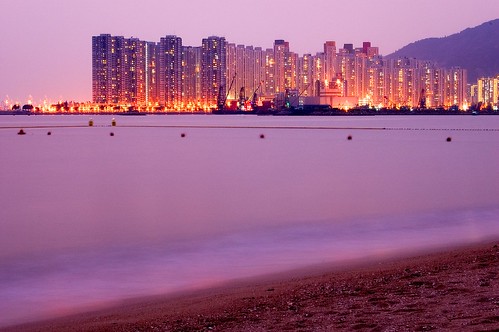
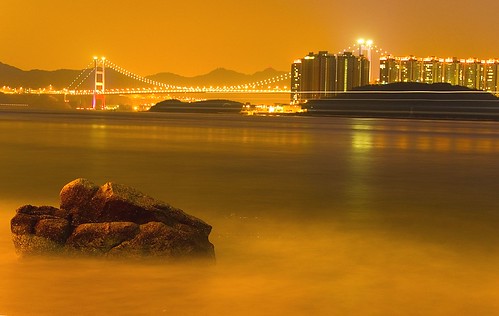
Here again we have that warm, rich "HDRness". And again, this image looks very much like a traditional photo. The crisp colours, and details in all of the shadows (even those pebbles have full shadow depth) is incredible. Again, this photo is shot into a setting sun, but we have colour, texture and perspective. Traditional methods would yield a silhouette.

Tuen Mun Dragonboat Races 2008

So, a very successful day's shooting, I shot around 650 frames out there in the hot sun. Been processing like mad since then, and have a few shots ready for display here.

It was tough as ever to get the shots, more so this year than last 'cos I was being hounded by security guards to move along from the quayside. There were more shooters there this year, too.

Exposure-wise, I was shooting with my Nikon SB-600 almost all the time, and was amazed at how well it took care of all the details, and how far it could shoot and recieve information to adjust the exposure. The cycle time was crazy, as well, even shooting 3 frames per second it could keep up.

Different day, different conditions, though: last year was bright sun, this year was overcast and threatening to rain in the morning. Which meant that the water was often a junk-coloured grey, and since it had been raining non-stop for the entire week before the races, the water was full of debris and mud. There was even a dead and bloated duck floating round. Yummy.

The floating offering
These offerings were made and released onto the waters early in the morning of the dragon boat races. Obviously meant to create good luck for the teams, they staged an impromptu race of their own before anyone got out onto the water.
you can also see how dirty the water was here in Hong Kong, after the heavy rains we have been having. The day before boat races saw the heaviest floods in 126 years on Hong Kong Island and the Lantau Expressway. 2 and 3
2 of the middle-size boats in action. I was quite happy with the symmetry of this shot, but for some reason blogspot is cropping it. Just click through to my Flickr page, which is hosting this photo.
racing to drum beat
This is another reason I like to hang out in Tuen Mun for the boat races: we have the biggest boats. Yes, ladies and gentlemen, size does count. And, for these boats, speed counts, too: because of the extra manpower, these boats really took off out of the water at the start line, and shot across the course. It was very difficult to get a shot of them, because they were absolutely flying. I managed to get some nice pics of the big boys, though - but it was more a case of shotgun than scalpel with the camera .

New York - or Liberty City, as it's currently known :) - may be the city that never sleeps, but Hong Kong has a fair claim to being a late-night town as well. Most of the shops here close at 10:00pm, and you're only getting ready to go out at 11:00 pm.

Hong Kong has a lot to offer in terms of cityscapes, and a view across Victoria Harbour on a sunny summer day is quite something- but the city leaves it's best take-my-breath-away beautiful for that time between sunset and sunrise, when the lights are on. And it really can take you breath away: a trip down to Tsim Sha Tsui always impresses, no matter how often I've been there over the course of the last three years.

Here's what I mean:

Hong Kong's Victoria Harbour

This is a shot I got a couple of weeks ago, and which I've been meaning to go and get for ages. It's taken during the Symphony of Light, which is a tourist-board initiative over which uses a host of buildings on both sides of the harbour as a giant light-and-sound production. It' s really something to see, as huge lasers flick out into the night sky, and whole buildings flash and pop their lights. Less something to hear, though, as the soundtrack is willfully appaling. BUt hey, you can't have it all.

Unfortunately, I took my travel-light tripod along with me on this shoot, rather than the big boy, as I was confident I could use some concrete blocks to lift the camera over the railings in the parkinglot I was using as a shooting location. I use this parking lot all the time, and was sure that the blocks would be perfect. Turns out I was wrong: using the blocks would have been downright dangerous, as they would leave me balancing my camera very pecariously 8 stories over a very busy walkway. Dropping objects from height in Hong Kong even by accident, is a criminal offence, to say nothing of the damage to my camera.

So I was forced to keep the camera on it's neck strap, hand-hold, balance and hope. I put the zoom all the way in, to 28mm, and pointed in roughly the right direction. Then, I took a deep breath, pushed the shutter-release, and waited the 30 seconds I was looking for. After two shots, I realised that I wouldn't be able to hold my breath for long enough. CO2 was filling up my lungs, making them feel like a balloon which was about to burst, and I started shaking.

So I then moved on to a series of slow, steady breaths out while taking the shots. I was balancing the camera on those offending concrete blocks, which was ok for just the camera (safely wrapped up on my neckstrap and resting on my pointer and middle finger for an approximation of the correct angle for the photo). I got two frames that kind of worked - they're nice and sharp, but I have had to crop them down from a 6 MP shot to about a 4 MP - which is less than ideal.

I also failed to check my settings before shooting, and shot JPEG, which hamstrings you a little when you get home and fire up photoshop. So I'm planning on a reshoot of the day, with the big daddy tripod and full zoom available to me.

Here's the other decent pic from the night's shooting:

Hong Kong's Star Ferry Pier and Victoria Harbour

which I think worked out really well. A little work on levels, a little sharpening and some removal of unwanted lens flare, and it brightened up well.

Shooting landscapes (or cityscapes, really) in Hong Kong is one of the best things to do while you're here, and because of it's nighttime photogenic properties, you'll generally be out there sometime lateish. This is what I've found to be my favourite locations, gear and settings (in no particular order):

  • 20 - 30 seconds, at ISO 200. I like to go with the lowest ISO rating I can- saves time on the noise, which I really detest about digital photography. Give me good old film grain any day, especially for black and white.
  • Water, somewhere, and often in the foreground. Reflected light gives some awesome colour effects here, and there are usually a lot of lights to reflect from. See the above two pics for what I mean, as well as this one:

Beach in Purple

  • Weird colours in the sky, and on the water, because of these reflections. These usually work for you, but the sky colour can often come out very bright at long exposures because of all the flight around. It can give you a nice fringed effect from the other side of a hill, or it can go luminous orange, which may or may not work out well. IN the shot above, the sea goes a nice colour, but the sky is all weird.
  • Tripod with stabilizing hook for you to put your camera bag on to hold the tripod steady. Hong Kong doesn't often have heavy winds (outside of a typhoon) but it does have a lot of poeple walking by your gear, which can cause a slight shake in your shots.
  • Shutter release cord or IR shutter release - it often happens that you bump your camera while you set off the shutter. Before I got the IR release for Nikon, I used the time release, which works fine for camera shake, but you can't time your shot to perfection.

So, Tsing Lung Tau, Victoria peak and TST beckon again, and I'll be shooting all at night again. Anyone else got any tips to add to this, or other night shot locations? I went up Tai Mo Shan a couple of weekends back, well before dawn, to get a sunrise over the city shot, but it turned out to be a complete bust: very hazy, and I couldn't see through some thick summer foliage. How about Jardine's Lookout, Kowloon side? I've never been up there. Any good?

Re-enter the Dragon- in a boat.

It’s that time of year again for anyone who lives in a Chinese community: Dragon Boat Festival is again upon us. You have to love the fact that we’re getting a free holiday on Monday ‘cos the festival is on Sunday, but you have to love even more the opportunities for photos that go with the boat races.

Last year in Hong Kong was exceptionally hot, and very bright and sunny, on boat racing day. This led to a few problems for me shooting the event, and although I got some nice shots, they’re not perfect. The difference between the highlights and shadows was huge, because I only really got into my stride after 10:30 (and they only started racing the big boats around then, too) and this meant that there was a lot of really strong light being reflected off the water, the boats and the oars. The shadows were pretty heavy, too, and while I was pulling the details of the shadows out in photoshop I ended up with slightly overexposed shots.

Here are a few which should show you what I mean. The photos are best viewed large, of course, click through (by clicking the image itself)to my Flickr page and check them out there:

Dragons at full speed

This vies for my best shot of the day, and even with the exposure issues, was picked up for the website of the Peninsula Hotel, where it will be published soon. But I still want to get a better shot of the races this year.

Hard at work

This shot is one of my personal favourites. It's quite dynamic, and gets the frenetic pace and mood of the day. With flash from my side of the photo, hopefully this shot will work better.

Catch up

Here's one of the tighter close-ups that I discuss a little further down on this blogpost, but it really shows the exposure flaws, and I hope that I'll be able to balance exposure here with grad filters and flash this year.


The real problem is in the venue itself: I live in Tuen Mun, in Hong Kong, and I prefer to be a part of the community here than to trek all the way out to Hong Kong Island, where I don’t really feel a part of anything. The boat races in Tuen Mun happen as the mouth of the river, which empties out into the sea at a typhoon shelter. The bank of the river where the races are held faces directly east, and in the early morning shots from that river bank will silhouette, leaving no colour detail. Fine for artistic shots (with a heap of luck) but after a while it gets tedious. Later on, the sunlight becomes very contrasty, and causes major exposure headaches: I was metering an 8-stop difference at 10:30.

I was using my Nikon D50 with a set of 17- 80 and 70-300 zooms, but no flash as I didn’t have a fast and powerful unit back then. I also didn’t use any filters, which would have helped me out a lot: balancing that harsh, light-grey sky and making it a little more interesting to look at. This year, I’m hoping to get on top of these aspects: I’ve got a set of 2-stop Cokin Grads for this, and I’m going to take my Cokin warming filter, to deal with the colouring of the midday sun, and give the pictures a warmer tone. I’ve also got a speedlite which should allow me to fill in some of the closer boats, and balance for the strong back sunlight which was a problem during the earlier part of the day. I’ve also got a polarizer, which should help later in the day only- you need to be 90 degrees to the angle of the sunlight for it to have an effect, and we face east for the shooting, so the sun will have to be quite high up for the filter to work.

I learned a lot from my composition from last year: try to leave as much of the sky out as possible. But I maintain that photography has much more to do with exposure than composition. You can crop and so on to improve composition, but a badly exposed shot will never really be satisfying.

I’ve also learned form last year that the best races to shoot are the heats rather than the finals. Maybe I was more committed than other shooters last year (but I think more because I had no idea what the line-up of the day was like, not being able to read Chinese) ‘cos I was down at the riverside at 07:00 am. Most shooters got there around 11:00 am. Which meant that I had a lot of space to run round in, and could choose my spot easily. The light was also closer to balanced, and I got more useable frames at this time than any other.

The events to go for are the big boat races- and the speed at which they shot past me was incredible. I tended to get a lot of motion blur, which worked really well in some shots, and not at all well in others. I’m going to the blur shots again this year, blut I’m also going to try and hit freeze-frame as well. What I noticed last year was that the freeze-frames needed to be quite tight close ups, which worked much better on the boat’s drummer than on the paddlers, and that these tight shots were much easier to get when I was at quite an angle to the boats, which meant they needed to be far away. Bigger lenses aren’t going be good, I doubt, because you’ll have trouble tracking the boats, and the shots will be too focused on one or two people in the boats. This is definitively a team sport, and shots of the whole team are better than shots of the individual most of the time.

When they got 90 degrees to me, I was able to get much better motion blur, as the speed was much more noticeable. But these shots needed to have a whole boat in them at least to be interesting, and the best ones comprised one boat that was in sharp focus in the foreground, and the others blurry in the background. It looked much better when that foreground boat was winning, too, which isn’t something that you can organize.

The last bit of experience that I got from last year was that the finish line is NOT the thing to shoot. Stay close to it, but shoot the boats coming toward you, otherwise you lose the excitement of the race. Faces and Eyes are important, even for these shots of people. The celebrations are good, though, if the winning boat is close to you.

But hey, it’s a sport, and sports shooting is often the most challenging because you can’t plan for it. It’s also some of the most fun, because of this.

Some other information about Hong Kong Dragon Boats:

  • Biggest event: Stanley
  • This year, there is a competition for photos which are shot in the Aberdeen area of Hong Kong, because this area was the first place to start Dragon Boat racing in Hong Kong.

Stock photography and other commercial applications

So the weekend turned out to be a bit of a washout here. Lots of rain, and the threat of a thunderstorm was always there, so I didn’t get out to the beach area to hit the shots I was planning. I did some setups at home, but nothing has really grabbed me from those images yet. So feeling pretty bleak – I like to get things done when I’ve identified them, ‘cos that fantastic image you see in your head often turns out to be like the memory of a dream, and can slip away very quickly.

What I did find over the weekend, and what excited me, was a stock photo company that for the first time laid out a great set of explainers on what they are looking and what you should be doing when you shoot your stock and when you sell it. So rather than posting an image here from the weekend, I’m going to run with the stock stuff.

The first tip: stay away from microstock photo sites

This may be a bit counterintuitive, but when you hear the reasons you’ll agree, I’m sure. I haven’t uploaded any of my shots to a microstock site, but there are reasons for temptation: these sites accept just about anything, from anyone, and you can vary your pricing. This makes sense to the amateur who’s looking to move up to semi-pro or pro. The thinking is “Hey, I’m shooting good pictures, people like looking at them, I’m sure a designer could use them”. Trouble is, people with no experience of selling images (or of selling commercial images) tend to make a mistake and undervalue their images, which is why microstock sites start their pricing at $1, and why the shooter gets a paltry 20%. BUt the thing is that if you think a designer or picture editor can use you images, you are implicitly thinking that a designer can pay for them, too. And they will have a budget, so you need to think about that right from the start: if you think you’re good enough to sell you shots, you need to sell them a price that’s fair for other pro shooters, and to yourself. Quality images take time and effort, so take that into consideration (preferably before the shoot, so you can get a better strike rate while you're out making the images).

So why stay away from the microstock sites? Surely they represent a viable segment of the industry? Well, yes, but it’s not the shooter that’s getting the viable segment of the industry pie here: by and large, these sites are royalty-free (meaning that anyone who buys your shots will get them for the rest of their lives, to re-use and re-use, endlessly, for whatever purpose and in whatever manner they choose, for the 20 cents that you would get from that shot. Now that may sound good to an amateur (Hey, I wasn’t getting anything before, right, so even 20 cents is worth it) but it’s making life tough for the pro shooters out there, and it is leading to market dilution.

Also, although the shooter may not get a lot out of the deal, just think how much the microstock web site is making out of the deal: it gets to keep 80% of your money, for providing very little service except that of a marketplace (which is provided by professional-level stock companies at less of a handling fee, but more on that later). So using these sites means that someone is getting a good deal, but it sure as hell won’t be the photographer.

Best practices for stock agency sites:

So good stock sites will allow you to keep more of your percentages, while allowing you to charge more and to tailor usage licenses for your buyers. That way, you’ll still be able to allow small companies and mom-and-pop design teams to use your your images if they want to (which is the usual argument for microstock sites- you’ll put these people out of business. Whoever heard of a mom-and-pop ad agency, though?) but you’ll have creative control of your images, and you’ll be contributing to the industry rather than undermining it. It’s a good deal for you, too, as you get more of your image value.

Look for agencies that offer you non-exclusive hosting of your image: this means that you’re free to give your image to other agencies. What it means in reality is that your stock agency has confidence in its business contacts and its ability to get your image sold – they don’t mind other people trying to sell it, ‘cos they’ll get it sold first.

Best practices for stock shooters:

This means that you may need to raise your own game a little, though usually just in terms of formats and sizes. It’s a good idea to find out the requirements for submission before you shoot the picture, because some agencies don’t allow image upscaling. A good basic to keep in mind is that most companies require a 6 megapixel image, minimum – in my experience even upscaled images need to be a base size of this before they were upscaled. It’s also a good idea to shoot in RAW format (they were big when we only had a 512 MB scandisk, but now you have no excuse), but failing this ability stick your camera on its highest setting and keep it there. If you are shooting JPEGS, remember that this is a lossy format, so don’t keep reopening your original, as each time you do you are throwing a bit of it away. Also, if you are cropping, you’ll usually need to keep your pixel ratio at 3000 by 2000 at least, so bear that in mind - depending on the agency, as some do accept other variations.

Obviously, you should always shoot clean, sharp images: keep noise out of the image in whatever way you can, and keep your camera steady and focused. If you have a smart camera with all sorts of in-camera sharpening and saturation bells and whistles, turn these off and keep your shot as neutral as possible: the designer will want to have the most options available with your image, so leave them the most room to work inside your image. They’ll also be using a much more powerful editing computer than your camera has inside it, so leave it to them.

And last, but definitely not least, you need to work hard. A lot of agencies ask you for between one and two hundred varied images, and each one of them will have to be inside the submission guidelines. Then, you’ll be expected to know how to negotiate your licenses, and how to price your shots. This means that you need to get a good handle on the various types of stock license available, which means that you need to know the meaning of these terms:

Model release: if you’re going to use a photo for commercial purposes, any recognizable person in the photo has to give you permission to use their image. For editorial (news) photos, it is not usually necessary to have this release, but often it’s good ethical practice.

Rights Managed: RM images are bought for use in specific and clear ways. Any deviation from that use will necessitate another puchase agreement. Usually, the price is determined by taking into account the intended use of the photo: if it’s intended for a large audience, it will have a bigger price tag. The purchase agreement will also give a limited timespan for the image’s use.

Royalty Free: The buyer buys the right to use the image without paying the photographer again, as many times as they like, and in as many ways as they like (barring certain minimal restrictions, such as resale). If you’re a photographer doing this, your giving away all control over your image, and you may well regret it.

Buyout: This term can be confusing, since there is no legal definition, but in practice it means that the purchaser will hold all rights to the image, including copyright and the right to license the image. If you sell your image under these terms, you should price high and get all you can, as you will have no rights after the deal has gone through.

Editorial usage: This is the part of the newspaper or the magazine that is not “hard” news, but more “background”. Nice definition? These areas are never clearly defined, and you can find problems in the grey areas here. Just remember, if you’re using the image as part of a story about the people or the place specific to the photo, its editorial. If you have the story, and then look for pics as an afterthought, they may well be commercial. This is a tough one to outline, but experience can help you. Especially experience in shooting stock images: when you know what it is to shoot stock shots, you will feel the difference between stock and editorial images.

World Press Photo Award interviews

It's the time of the year when World Press Photo features the interviews of the behind-the-scenes activity around some of the press photos of the year and the year before in the archive. Have a look around the site, there are over 40 interviews with some of the best photographers working today, and some really phenomenal images under discussion.

The link is here.

First Post!

Well, here's my Hello World moment. Been putting this off, because although I've felt that I should run a blog for a while, it just seems that there's never anything to write about when I sit down in front of the screen - and especially hard to kick it all off.


So I'm just biting the bullet here and rambling away. I intended this blog to be a vehicle for the rambling thoughts (photographic and otherwise) I am having at any given time, so I could come back and view them and maybe be able to act on them later when I had an answer or a new idea to try out.


Whether this happens remains to be seen, but if you don't start, you don't finish. So I'm starting.


First up, a little about me


Turning thirty this year, and been taking photos for just over half of that time. Things have gotten much easier since I got a job (photography is many things, but it is not cheap, and tough for a teenager or student, as the choice between film and beer is hard to make) and since digitial came round - no film costs. That said, I miss the darkroom time you used to have to put in, and the feeling of rinsing out a canister of films after the chemical wash, and unrolling them to see if you got anything, and whether any of it was any good, just can't be replicated in the digital world.


I really don't grudge my new kit, though: a Nikon D50 kit, to which I've added a 70-300 Sigma and an SB-600 flash. The D50 was an Xmas present a couple of years ago from my lovely wife, now starting to feel a little tired and in need of a new body ( and I'm talking about the D50, people, not the lovely wife). I find the camera and lens configuration perfect for 98% of photographic scenarios and assignments, and I love the Nikon CLS system. The camera also manages very well under some fairly intense exposure problems, and I can't say that I've ever been anything less than impressed with it's preformance. And yes, I have tried Canon, and think it's on a par. I used an EOS system for film. Now, though, I doubt I would go back, because of the significant investment in Nikon equipment. So don't start an equipment flame war, guys. Funny how it's always the guys, I've never had an argument like this with a woman photographer. Some inadequacy issues, maybe? Anyway, it's not the camera, it's the eye. I've seen some incredible images taken on plastic toy cameras like Diana and Holga, and seen some very impressive rigs out here being used to much less effect.


I've also become a fairly heavy user of Cokin Filters - a Polarizer, a light yellow and a couple of graduated ND's, which I think are essential for interesting skies out here in Asia (I'm looking at you, yellow filter) and for getting good sky exposure balance anywhere during the day.


The photographic potential of my new home - Hong Kong- is unlimited, and the biggest problem I have in getting my own projects done here is keeping focused on what it was I came out to shoot in the first place. And remembering what it was I saw last week and thought "Hey, you've got to come back and get a shot of that at dusk / dawn / dragon boat festival / Chinese New Year." Which is another reason for this blog - to record those thoughts and run with them. Plus, it's to motivate me to get out and pursue my own identified projects, which can be a tough ask after a hard week's grind.


What this blog is about


Well, hard to say at this stage. The aims are hazy, but I would like to see projects proposed, researched, shot and discussed here. I'm always ready for a new challenge, and I am always looking for new places and events to shoot here in Hong Kong and elsewhere. I'm very open to discussion and other viewpoints, and I find that it's something I don't really get enough of in HK, so I'm hoping that there will be a comment or two posted telling me what solutions there are to my problems, or what your experience is of similar issues and ideas.


Going through the next few weeks, I'm going to go over a few highly inspirational blogs and photographers, and start work on my project for this week: night shots in Tsing Lung Tau. So watch this space, and if I get a break in the weather (which has been very bleak here over the last bit, wall-to-wall rain) I'll be posting my shots. This is what I got last time I went out there:

Tsing Ma Bridge: last shot fixed

Which was pretty promising, but a lot more can be done out there. Plus, it's close to home for me, so I can get down there quite easily. You can look at my flickr photostream to view it large, and see some other shots from around that area:

http://flickr.com/photos/daveb_za/

Have a look, and watch this space for more!